My blog has moved!

You should be automatically redirected in 8 seconds. If not, visit
www.greenislescrafts.com
and update your bookmarks.

Tuesday, September 14, 2010

Goodbye Draygonfly Dreams

 
This is it guys!  All the posts have been moved to the new blog, I've dusted the corners and am now walking along the empty halls of my familiar blogging home for the last time.


We have not lost anything with the move.  Everything is packed and nobody should be left behind.  If you have not bookmarked the new site, hope on in the last box and let's get going!

Even if you miss this last box, this old site is not going away and I've left directions on how to get you to the new blog.  You'll automatically be redirected after a few seconds on the site.


Look forward to seeing you at the new place!  We have blogging tutorials, computer and photoshop tips, paper crafting, quilting, phototgraphy, letterboxing, stamp carving and even links to my blog designs. 

See you there!

Thursday, September 9, 2010

Le Jardin de Papiers - Blog Design


Here's a snapshot of a new design I did.  Click on the image below to get the full details.

Tuesday, September 7, 2010

Digi Quick Page Freebie - Photo Cluster 20100907


Did you every try something and then just decide you kind of were not that good at it?

For years now, I've been trying (in vain?) to recreate in paper what I can easily do in digital.. be it cards or scrapbook pages or whatever.

It's just so hard for me to use the paper supplies and when I do, nothing comes out like this.  So, I'm jumping back into what I love --- playing on the computer and I thought I'd share some of my quick pages with you guys.  I'm positive that others are doing this too and probably already have a name for this kind of thing. 

Basically, you bring your paper into your photo editing **software and clip it to the shapes.  Then embellish with goodies and text and finally insert your images (also clipped in).

With a quick page file like this, you can have a digi scrapbook page finished in minutes.  The sample above was finished in 6 minutes with a free digi kit called Counting Sheep from Carrie Stephens.

This download is available for a limited time... so get it before it's gone!

Get it HERE!

**Your software must handle layers - PS, PSE, Paint.net and GIMP all do this. This file was created in CS5 with maximum backward compatibility.

Monday, September 6, 2010

You Rock - Digi LO


I've been playing digital lately.  It's so easy to create a design and then print it for my 8 x8 album.  This layout is done in Joey's favorite colors.  It's for the Unscripted Sketches Challenge.

Thursday, September 2, 2010


This 8x8 page was made for the Digi Scrapping Challenge Masking 102 .  I used elements from the Natural Breeze kit.

Laura has a great tutorial available at the link above, but I do this a bit differently.  Here's a little how to on doing this break out.


Bring photo into photoshop

Drag in and size a frame (can also do a stroked selection)


Click photo layer and use lasso tool to do a rough selection the part of the image that will be the break out. Be sure to include the image inside the frame.

Copy selection to a new layer and name it Break Out

Hide the photo layer


Remove background from the break out layer (selection tools, eraser, masking - whatever you are comfortable with)


Unhide photo layer

Click on the frame layer

Use magic wand selector and click outside the frame

Expand selection (Select/Modify/Expand) if needed so that it is at the edge is right at or just inside the outer edge of the frame.

Click the photo layer and press delete


 Move the break out layer above the frame


Create a new layer under the break out layer and name it Shadow

Use a soft brush to paint in a shadow behind the breakout.

Finish with digital papers and embellishments

    Monday, August 30, 2010

    Custom Storage Solution for Embossing Folders and Dies

    ttodd on the Florida Stampers group asked us for ideas for inexpensive storage for embossing folders and dies.  This was my suggestion:  If you are looking for inexpensive -- and have a little time -- why not consider custom? 

    Office supply stores are going to be marking down binders In the next week or two.  I got a bunch of them last year for a penny each from Office Depot.  Watch for sales and pick up a few more than you think you'll need.  That way you have room to grow and they will match.  Consider the insert type of binder so you can put labels into the spine to indicate what's inside.
    Binders.jpg

    Then get a package of the heavy duty sheet protectors.  look for 3 mil or higher.  We are going to modify these to hold your dies. You can do basic sizes like these

    Binder pockets.jpg
    Or you can do custom sizes for the pieces you have.  Just measure and add an inch or so; this lets your die sits inside the pocket and gives it room to move on all sides.  You need to be able to slip it in and out without needing to pull the pocket apart.

    Overview:
    You are going to cut through the top layer of the sheet protector to create additional openings.  Then you'll be sealing the bottom edges of any pockets that require it.

    Supplies:


    • Binder
    • Sheet protectors
    • Scotch tape
    • Craft knife
    • Cutting mat
    • Ruler
    • Sewing Machine or Sticky Strip
    • 1.5" Circle Punch (optional)


    Process:

    1.  Cutting the Pockets


    • Use the item to be stored to measure and mark your cut lines with a strip of scotch or masking tape. You are going to need to add a little space around the edges so that the item can be removed easily. You'll need a good half an inch at the bottom for things the thickness of this embossing folder.
    • Insert a cutting mat, double layer of chipboard or a clip board into the sheet protector.  You can use anything you have. This is just to stop the blade from going through the back. 
    • Put a ruler along the tape edge and use a craft knife to cut through the sheet protector.  Do not cut through the edges.
    • Move the ruler 1/4 inch and cut again.  Remove this strip entirely.


      2.  Sewing the Pockets

      • Set your machine to a long stitch length
      • Use a teflon foot, walking foot, or reduce your presser foot pressure.  I have a teflon foot for my machine and it's a breeze to stitch over the plastic.
      • Put the folder in the pocket to check the setup.  Move the needle closer to the cut edge, if needed.
      • Sew the bottom edge of the pocket
      •  If you are dividing pockets, sew from the bottom to the top. This will help to prevent a buckle at the end of the stitch.  Start with the needle in the stitching line.

      • If you don't have a sewing machine, you can do this with Sticky Strip too.  The hold is not as strong, but it will work.

        3. Finishing the Pockets

        •  Use a 1.5" circle punch (which ever you have) to make the notches at the top of the pocket.
        •  If your punch doesn't make a nice cut, try inserting a piece of paper to give it more stability.  If it's still gimpy, you'll need to sharpen the punch.


        •  Fill with goodies and put it in your binder/binders.

          Notes:

          • Adhere examples of dies to the inside (front) of the pocket.  If you put them onto colored CS first, it works great and doesn't get damaged with repeated removal of the die.
          • You can store your spellbinders this way too, on CS with a strip of magnetic tape attached.
          • If you have thicker dies, you can create a pocket for them as well, but it takes a bit more work, let me know if you need those instructions.
          • Yes, I know you can do the cutting without the tape, but the ruler can easily slip.  The tape helps to prevent that and is an added ridge that could stop your knife from slipping with the ruler.

          Tuesday, July 27, 2010

          Tased Pants Blog Banner

          A couple of kooky kids in Florida have decided to do a web show.  They needed a banner and with a name like Tased Pants, how could it not be a funky banner?


          I should tell you that these are my kooky kids!  So I had complete creative freedom.  I created this text effect using photoshop filters and zapped the pants with some static to be their logo.  

          They love it and have already got ideas written out for a couple months worth of shows.

          Saturday, July 24, 2010

          Internet Explorer 8 - Got Problems?

          If you have a Windows machine and you've been a good doobie and downloaded the updates then you've been given the opportunity to upgrade to Internet Explorer 8. Were we good doobies?  Sure sure. Personally, I'm a Firefox and Chrome girl, but we used IE where I used to work.  Anyway, it was a slug and in the words of a wonderful girl I used to know in Texas, "That dog won't hunt!"

          This fix does work for some people. *nodding*  Although it really shouldn't.  See what this does is correct registry entries for a core library for IE... something that should never ever be a problem in the first place. Still it worked for the Doc's computer over a year ago and I just had to apply it to a computer I was working on for a friend.

          So, I thought that you guys might be having some issues as well. 

          WINDOWS XP

          • click Start, then Run
          • type cmd and press Enter
          • enter this command and press Enter:
          • regsvr32 actxprxy.dll
          • restart

          WINDOWS VISTA/WINDOWS 7

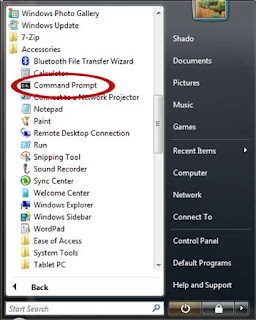
          • click Start, then All Programs, then Accessories
          • right click Command Prompt
          • click Run As Administrator.
          • enter this command and press Enter:
          • regsvr32 actxprxy.dll
          • restart 


          You should get a confirmation window and then you can close it as well as the command prompt window.

          Let me know if this helps or if you have other issues you need help with.


          Monday, July 19, 2010

          Tintype Photo Restoration


          Original   2" x 3"
          It's faded with time and has many discolored spots
          Fine cracks cover the surface and the images is worn away in several places
          Rust at the edges made the image chip away on all sides
          This is a scan of the tintype. The original is 2 x 3" and as you can see it's a little worse for wear.  Sad, but not hopeless.  This client contacted a company in Ft. Worth to ensure that the image is saved for future generations with digital restoration.  I was called in as this image needed a little of a hands on approach.  My process is a combination of filters and digital processing along with hand painting with a digital brush.

          Preservation of the original is highly recommended as well.  I'll give references at the bottom of this post if you are the lucky owner of images like that and would like to preserve them.  

          Do you want to see the result?  *grin*  It was so fun to do!

          Sepia
          Not only did I correct the things mentioned above, but also painted in the corners that had been cut off.  I am all about choices though, so I also sent it back as a black and white image.

          Black and White
          These images can be printed easily at 8 x 10" (or any size below that).   Saving this piece of history is an amazing feeling!

          Now, back to the original.  You should know that original tintypes are very light sensitive and should be handled with gloves to prevent oil from your fingers from causing further damage.  Please consider consulting a professional conservator about preservation of these treasures. A conservator can consult on matters of preservation, display and storage.  In addition, many offer expertise in safely cleaning and restoring damaged photographs.  Not all conservators offer the same services, but most will make referrals to other specialists in the field.

          If you live near a museum with a large collection of photographs, that's a great place to start your search for help.  Also consider the professional group, The American Institute for Conservation of Historic and Artistic Works. (AIC).  They offer a referral service to help you find someone.

          The AIC web site is part of the Conservation On-Line (COOL). 
          The American Institute for Conservation of Historic and Artistic Works (AIC) and FAIC Conservation Services Referral System, 1717 K Street N.W. Suite 301, Washington, D.C. 20006; Telephone: (202) 452-9545; Fax: (202) 452-9328

          Wednesday, July 7, 2010

          4th of July


          This card started out as a way to play with the vibrant colored scraps that my friend Sharon gave me.  These are retired card stocks from Stampin Up and we can't just let them go in the trash can we???  No!

          Here's the inside ---- I gave this one to my landlords with the rent check.  They are such a sweet couple and I adore Jennifer to pieces - so it's fun to make them a little something every now and then.

          We spent the fourth enjoying the beach and fireworks.  It can get pretty crowded - but this year the crowd didn't fill the sand until right about dark.  So, evening at the beach was pretty nice.


           Morgan waited anxiously for the sun to set.  For a moment - we had a beautiful orange sky.


          Bob had a hard time capturing the show because there were kids setting off their own fountain fireworks right in front of us.  He did get some really good shots though.   I just love how the fireworks reflect on the wet sand! 


          How'd you spend your day?

          Monday, June 21, 2010

          Post Modern Expression in Journaling


          Or at least that's what Bob calls 'em~  This one is stitched differently.  Rather than have the long exposed stitches in the center of the spine, here there are two sets of stitches visible near each end of the spine.  It's not more secure, but purely for effect.


          Due to the nature of this material, I reinforced stress points on all three of the books that I made.  The red felt triangle gives strength where the tie (or wrap) is attached.  Inside, the spine has a second layer of the foiled foam.


          Red felt, stitching, bookmark and strap make it fun and fabulous! 

          Oops!  Dixie told me it sold on the first day! 

          Size - 5.5 x 4.25 inches and is 1.18 inches thick
          Paper - 240 pages (both sides) of 24 lb recycled writing paper

          Recommended Uses
          • Writing - Yes
          • Sketch - Yes
          • Washes- light
          • Stamping -Yes
          This journal is available at Whistlin Dixie - Dillsboro, NC.  

            Sunday, June 20, 2010

            Red Leather Journal - reclaimed

            Red Leather.  So vibrant and pretty - plus you can find it in your backpack soooooo much easier! *chuckle*

            This leather is reclaimed from a garment that I painstakingly took apart - stitch by stitch.  It was headed to the landfill - can you believe it?  Not anymore.  Now it'll be enjoyed in a whole new way for years to come.

            There are more coming for you to see out of this leather!

            Size - 5.5 x 4.25 inches and is 1.18 inches thick
            Paper - 240 pages (both sides) of 24 lb recycled writing paper

            Recommended Uses
            • Writing - Yes
            • Sketch - Yes
            • Washes- light
            • Stamping -Yes
            This journal is available at Whistlin Dixie - Dillsboro, NC.  

              Saturday, June 19, 2010

              Fused Plastic Journal, Tan with Brghtly Colored Stitching

              This fused plastic journal uses four shopping bags from two different stores.  The printing on the bags can be seen through all the layers.  Looks like shadows and things -- I think it looks cool.  The closure and the spine are reinforced with the scrap from the fused plastic process.  Nothing wasted!

              The bags had orange and green printing on them so who was I to argue with the color scheme?  heh  In reality, Joey and I couldn't decide which color would look best, so I used both.  heh.  The perk is that it has two bookmarks now, one in each color.

              Here's a shot with the tie or wrap removed so you can see the stitches better.  Definately a book to feel good about using!

              Size - 5.5 x 4.25 inches and is 1.18 inches thick
              Paper - 240 pages (both sides) of 24 lb recycled writing paper

              Recommended Uses
              • Writing - Yes
              • Sketch - Yes
              • Washes- light
              • Stamping -Yes
              This journal is available at Whistlin Dixie - Dillsboro, NC.  

                Friday, June 18, 2010

                Embossed Leather Journal with a "fluffy" cord


                I love this embossed leather!  I was making this book with it when Morgan asked why I didn't have one with a thick "fluffy" cord.  (I make these cords for handles on bags and things and she just loves 'em) So of course, this one had to have a fluffy cord to close it~

                Size - 7 x 5 inches and is 1.18 inches thick
                Paper - 240 pages (both sides) of 24 lb recycled writing paper

                Recommended Uses
                • Writing - Yes
                • Sketch - Yes
                • Washes- light
                • Stamping -Yes
                This journal is available at Whistlin Dixie - Dillsboro, NC.  

                  LinkWithin

                  Blog Widget by LinkWithin