My blog has moved!

You should be automatically redirected in 8 seconds. If not, visit
www.greenislescrafts.com
and update your bookmarks.

Showing posts with label Photo Editing. Show all posts

Monday, July 19, 2010

Tintype Photo Restoration


Original   2" x 3"
It's faded with time and has many discolored spots
Fine cracks cover the surface and the images is worn away in several places
Rust at the edges made the image chip away on all sides
This is a scan of the tintype. The original is 2 x 3" and as you can see it's a little worse for wear.  Sad, but not hopeless.  This client contacted a company in Ft. Worth to ensure that the image is saved for future generations with digital restoration.  I was called in as this image needed a little of a hands on approach.  My process is a combination of filters and digital processing along with hand painting with a digital brush.

Preservation of the original is highly recommended as well.  I'll give references at the bottom of this post if you are the lucky owner of images like that and would like to preserve them.  

Do you want to see the result?  *grin*  It was so fun to do!

Sepia
Not only did I correct the things mentioned above, but also painted in the corners that had been cut off.  I am all about choices though, so I also sent it back as a black and white image.

Black and White
These images can be printed easily at 8 x 10" (or any size below that).   Saving this piece of history is an amazing feeling!

Now, back to the original.  You should know that original tintypes are very light sensitive and should be handled with gloves to prevent oil from your fingers from causing further damage.  Please consider consulting a professional conservator about preservation of these treasures. A conservator can consult on matters of preservation, display and storage.  In addition, many offer expertise in safely cleaning and restoring damaged photographs.  Not all conservators offer the same services, but most will make referrals to other specialists in the field.

If you live near a museum with a large collection of photographs, that's a great place to start your search for help.  Also consider the professional group, The American Institute for Conservation of Historic and Artistic Works. (AIC).  They offer a referral service to help you find someone.

The AIC web site is part of the Conservation On-Line (COOL). 
The American Institute for Conservation of Historic and Artistic Works (AIC) and FAIC Conservation Services Referral System, 1717 K Street N.W. Suite 301, Washington, D.C. 20006; Telephone: (202) 452-9545; Fax: (202) 452-9328

Friday, July 10, 2009

How to Paint Text in Photoshop


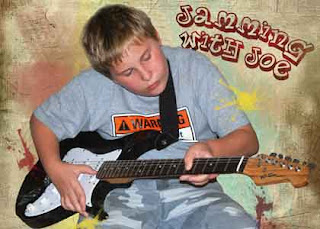
This isn't part of the class I'm taking. It's just me playing around. First I'll tell you the steps I took to get this image and then explain how to do painted text on your own.

Just a note, I use Photoshop, but if you don't have it, many of the photo editing programs support layers and can do these things.

Here are the layers that created this image:

Layer 1 - Fill layer, tan
Layer 2 - Watercolor brushes, various colors, opacity 50%
Layer 3 - Text, Planet Benson 2 Font, Arced, tilted
Layer 4 - Two colors painted over the text in mottled pattern,
then clipped to text layer*
Layer 5 - Mesh texture layer
Layer 6 - Joey, cut away from the background, splatters
painted with layer 2 colors
Layer 7 - Mesh texture layer (copy), opacity 55%

*Clipping layers together applies the shape of the bottom layer to the pattern or color of the top layer.


In this image, I've added a new layer on top of the text and painted over the lettering. I like to use multiple colors to get more depth. Leave some areas open and the original color of the text will show through there.


Here, the painted layer was clipped to the text. Doesn't it look awesome?.

It's easy to do. In CS4 you select either layer, hold the alt key and hover your mouse between the two layers. The icon will change to a double circle. Click there and it's done. In Photoshop 7, you select the top layer and press CTRL+G to group or clip the selected layer with the one below it. If you don't have either of these, google how to do it in your software.

You can use this technique to clip photos to a shape, paint or texture to text and a world of other possibilities. Go play!

Thursday, July 9, 2009

Better Days

Katrina affected people who were many many miles from the devastation of the gulf coast. We did a mini photo journal of the storm damage that largely went un-noticed in rural Mississippi.

This is one of those images. I am drawn to architecture where Robert is drawn to nature photography. So our portfolios are drastically different. Yet each shows something that we all understand. Loss. For me, this journey showed the loss of historical buildings that residents hardly even see anymore. Many of the places in my shots were torn down in the cleanup days and they are gone forever.

We did clipping masks in class today. The same as I did on the Make it Last post earlier this week. She showed us a different way of clipping the layers together (CS4 is different than Photoshop 7). There are many ways to accomplish the same thing in Photoshop. Sometimes the way other people do it can save us some time.

Wednesday, July 8, 2009

Precious Girl


This was taken at the Jacksonville Beach Summer Jazz Series. Morgan and I tend to shelter from the sun under umbrellas. The light blew out the black of her umbrella and nearly washed this picture out completely.

Photoshop can color correct with no problems but in the class I'm taking I did something new today. We created a vintage hand tinted image. First I cropped the pic and reduced the saturation. A sepia tone was added and finally I colored her cheeks, lips, eyes and shirt on separate layers.

Then I added a frame from the class and used brush stamps to put the flourish under my title.

The text effect is not part of the class... or at least not that I know of. It's a pillow emboss after a white stroke was put on the text. (These are layer styles.) It makes it look like it's enameled. Fun fun.

Monday, July 6, 2009

Make it Last


Another shot from Joey's trip. This one featured a near silhouette of Joey with the setting sun sparkling over the water. It's a great shot. Perfect for a scrapbooking title too. So that's just what I did. All of this is digital, but you could do this as a hybrid as well. I'm printing it to use on my page as the title.

I used a grunge mat to rough up the edges and added text that I'd cut from a fiery piece of digital paper. The paper was made just for this shot and was recolored using the hue and saturation adjustments before being put in the background.

If you guys would like information on how to do this type of thing in photoshop or your own photo software, let me know in a comment and I'll post the info or email it to you.

Thanks for hanging out with me today!

Joey's Dream Weekend

Joey goes to Texas for the summer every year. They do all kinds of things while he is there. This year was something special though. They joined his uncle at the lake for the holiday weekend. Joey spent a lot of time on the boat or pier fishing. His dream weekend realized!

Wes just sent me some pics and I had to share this one with you guys. The frame and text are added in photoshop, along with a little edge darkening.

I'm taking the Jessica Sprague Frame-ups and Special Effects class. So far, nothing new for me, but I welcome the opportunity to learn. You never know where ideas and tips will come from.

LinkWithin

Blog Widget by LinkWithin